一、准备UEditor
在 官网下载合适的UEditor(这里使用的是jsp版本)
解压红 色 框 部 分 是 前 端 需 要 的 \color{red}{红色框部分是前端需要的}红色框部分是前端需要的,j s p 文 件 夹 里 面 的 是 后 台 需 要 的 \color{blue}{jsp文件夹里面的是后台需要的}jsp文件夹里面的是后台需要的 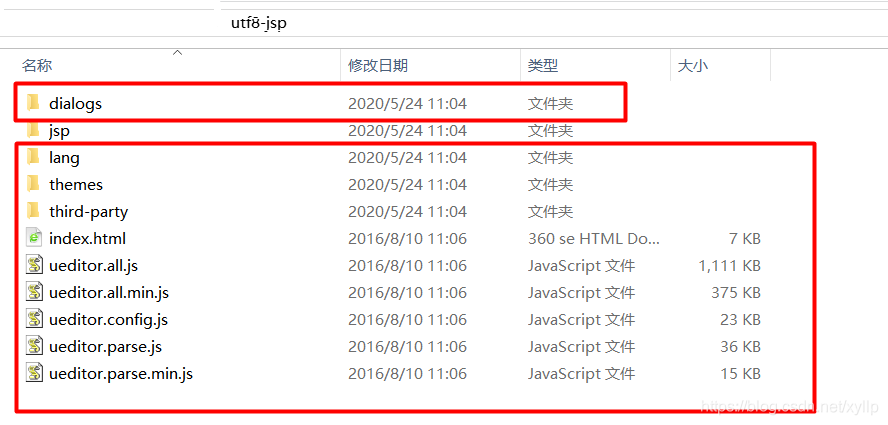
二、vue-ueditor-wrap组件
安装vue-ueditor-wrap
npm i vue-ueditor-wrap
在main.js引入vue-ueditor-wrap
import VueUeditorWrap from ‘vue-ueditor-wrap’
在main.js中进行全局组件挂载
Vue.component(‘vue-ueditor-wrap’, VueUeditorWrap)
参考vue-ueditor-wrap的github
三、前端配置UEditor
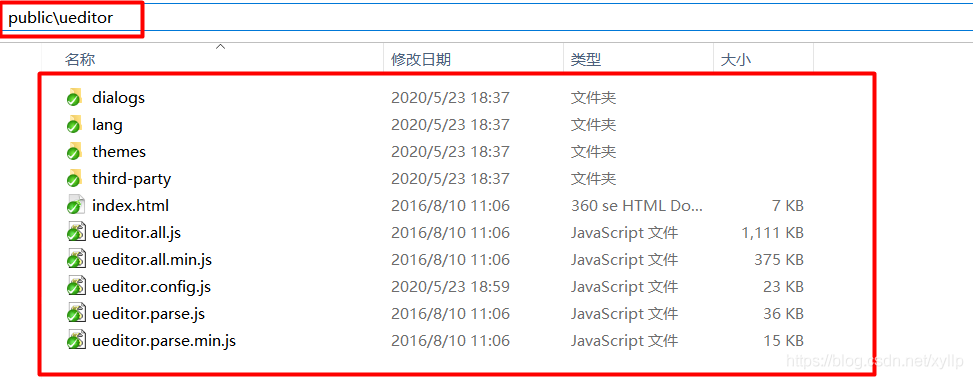
在public目录下新建ueditor文件夹,将属于前端的ueditor内容复制到该文件夹内
在env文件中配置V U E _ A P P _ U E D I T O R _ H O M E _ U R L \color{red}{VUE\_ APP\_UEDITOR\_HOME\_URL}VUE_APP_UEDITOR_HOME_URL和V U E _ A P P _ U E D I T O R _ S E R V E R _ U R L \color{red}{VUE\_APP\_UEDITOR\_SERVER\_URL}VUE_APP_UEDITOR_SERVER_URL,用于在vue文件中使用vue-ueditor-wrap
# 开发环境配置
ENV = ‘development’
# 若依管理系统/开发环境
VUE_APP_BASE_API = ‘/dev-api’
# 路由懒加载
VUE_CLI_BABEL_TRANSPILE_MODULES = true
VUE_APP_UEDITOR_HOME_URL = ‘/ueditor/’
VUE_APP_UEDITOR_SERVER_URL = ‘/dev-api/ueditor’
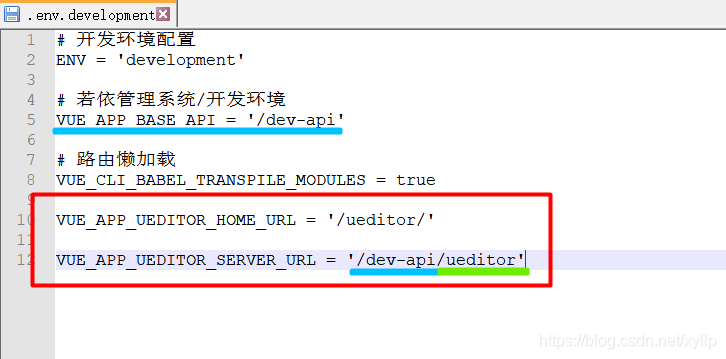
说明:
红色部分:使用vue-ueditor-wrap需要配置的部分,这样做的好处是,当ueditor的服务器地址变化后,只需要修改环境配置文件即可,而不是到每个用到的页面去替换修改
蓝色部分:表示在哪个环境(开发环境,生产环境,…环境)的前缀,推荐配置的时候加上,这样进行NGINX反向代理或者接口访问的时候,可以统一入口url
绿色部分:ueditor后台访问地址
在vue.config.js中找到devServer配置Dev代理
// webpack-dev-server 相关配置
devServer: {
host: ‘0.0.0.0’,
port: port,
proxy: {
// detail: https://cli.vuejs.org/config/#devserver-proxy
[process.env.VUE_APP_BASE_API]: {
target: `http://localhost:8080`,
changeOrigin: true,
pathRewrite: {
[‘^’ + process.env.VUE_APP_BASE_API]: ”
}
},
// 加入ueditor服务端地址的代理
[process.env.VUE_APP_UEDITOR_SERVER_URL]: {
target: `http://localhost:8080`,
changeOrigin: true,
pathRewrite: {
[‘^’ + process.env.VUE_APP_UEDITOR_SERVER_URL]: ”
}
},
},
disableHostCheck: true
},
四、后台配置UEditor
在项目路径下新建lib目录,并将jsp文件夹下的jar包拷贝进去,值得注意的是,你需要查看一下jsp文件夹下的jar包在项目里面是不是已经有了,如果有的话,就不需要拷贝进去了,其 实 就 是 缺 哪 个 , 拷 贝 哪 个 \color{red}{其实就是缺哪个,拷贝哪个}其实就是缺哪个,拷贝哪个
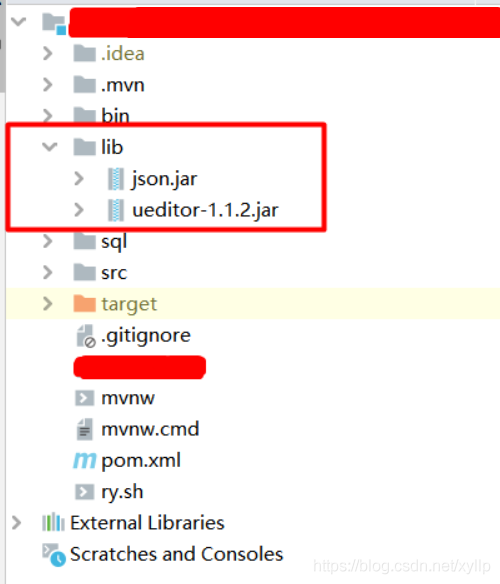
因为我的项目里面已经有了其他的jar包,所以就只导入了json.jar和ueditor-1.1.2.jar
修改pom文件引入本地jar包依赖
<dependency>
<groupId>ueditor</groupId>
<artifactId>ueditor</artifactId>
<version>1.1.2</version>
<scope>system</scope>
<systemPath>${project.basedir}/lib/ueditor-1.1.2.jar</systemPath>
</dependency>
<dependency>
<groupId>myjson</groupId>
<artifactId>myjson</artifactId>
<version>1.1.2</version>
<scope>system</scope>
<systemPath>${project.basedir}/lib/json.jar</systemPath>
</dependency>
修改pom文件配置打包
这里的关键配置是< i n c l u d e S y s t e m S c o p e > t r u e < / i n c l u d e S y s t e m S c o p e > \color{red}{<includeSystemScope>true</includeSystemScope>}<includeSystemScope>true</includeSystemScope>这句话,使得打包的时候,能够将本地jar包一起包含进去
<build>
<finalName>${project.artifactId}</finalName>
<plugins>
<plugin>
<groupId>org.springframework.boot</groupId>
<artifactId>spring-boot-maven-plugin</artifactId>
<configuration>
<fork>true</fork> <!– 如果没有该配置,devtools不会生效 –>
<includeSystemScope>true</includeSystemScope>
</configuration>
</plugin>
</plugins>
</build>
复制config.json到resource目录下
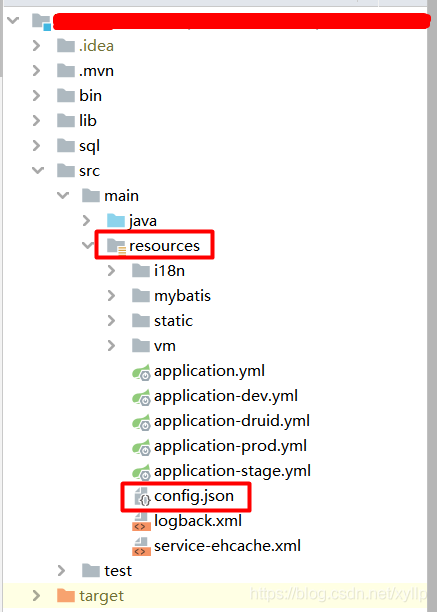
修改config.json的controller映射路径,设置图片访问前缀为空
修改ConfigManager读取config.json,注意:这里只列出了修改过的方法,由于篇幅原因,没有将未修改的部分列出。修 改 部 分 均 已 添 加 注 释 \color{red}{修改部分均已添加注释}修改部分均已添加注释
package com.baidu.ueditor;
import org.json.JSONArray;
import org.json.JSONObject;
import org.springframework.core.io.ClassPathResource;
import java.io.*;
import java.util.HashMap;
import java.util.Map;
public final class ConfigManager {
private ConfigManager(String rootPath, String contextPath, String uri) throws FileNotFoundException, IOException {
rootPath = rootPath.replace(“\\”, “/”);
this.rootPath = rootPath;
this.contextPath = contextPath;
// 这里填写配置文件位置,虽然加载时没有用到,但是起到了注释的作用
this.originalPath = “src/main/resources/config.json”;
this.initEnv();
}
private void initEnv() throws FileNotFoundException, IOException {
File file = new File(this.originalPath);
// 因为项目采用的jar包方式启动,使用文件方式获取的话,是存在问题的
// 所以注释掉
// if (!file.isAbsolute()) {
// file = new File(file.getAbsolutePath());
// }
this.parentPath = file.getParent();
String configContent = this.readFile(this.getConfigPath());
try {
JSONObject jsonConfig = new JSONObject(configContent);
this.jsonConfig = jsonConfig;
} catch (Exception var4) {
this.jsonConfig = null;
}
}
private String readFile(String path) throws IOException {
StringBuilder builder = new StringBuilder();
try {
// 在这里并没有使用传进来的path,
// 而是使用spring的ClassPathResource来加载文件
// 防止打包方式为jar时,找不到文件的问题
ClassPathResource resource = new ClassPathResource(“config.json”);
InputStreamReader reader = new InputStreamReader(resource.getInputStream(), “UTF-8”);
BufferedReader bfReader = new BufferedReader(reader);
String tmpContent = null;
while((tmpContent = bfReader.readLine()) != null) {
builder.append(tmpContent);
}
bfReader.close();
} catch (UnsupportedEncodingException var6) {
}
return this.filter(builder.toString());
}
}
五、配置类、工具类及Controller编写
配置类
- CloudApiConfig
-
package com.ruoyi.project.cloud.config;
import lombok.Data;
import org.springframework.boot.context.properties.ConfigurationProperties;
import org.springframework.stereotype.Component;@Data
@Component
@ConfigurationProperties(prefix = “cloud”)
public class CloudApiConfig {private String accessKeyId;
private String accessKeySecret;
private String ossBucketName;
private String ossEndpoint;
private String smsSdkAppid;
} - UploadImgConfig
-
package com.ruoyi.project.cloud.config;
import lombok.Data;
import org.springframework.boot.context.properties.ConfigurationProperties;
import org.springframework.stereotype.Component;@Data
@Component
@ConfigurationProperties(prefix = “upload.img”)
public class UploadImgConfig {
private String accessUrlPrefix = “”;
private long maxSize = -1;
}
工具类
package com.ruoyi.project.cloud.util;
import com.aliyun.oss.ClientConfiguration;
import com.aliyun.oss.OSSClient;
import com.baidu.ueditor.define.BaseState;
import com.baidu.ueditor.define.State;
import com.ruoyi.project.cloud.config.CloudApiConfig;
import com.ruoyi.project.cloud.config.UploadImgConfig;
import lombok.extern.slf4j.Slf4j;
import org.apache.commons.io.FilenameUtils;
import org.apache.commons.lang.RandomStringUtils;
import org.springframework.web.multipart.MultipartFile;
import java.time.LocalDateTime;
import java.time.format.DateTimeFormatter;
import java.util.Locale;
import java.util.Optional;
/**
* OSS工具类
*/
@Slf4j
public final class OssUtils {
private OssUtils() {}
/**
* 默认格式化方式
*/
public static final DateTimeFormatter DATE_TIME_FORMATTER = DateTimeFormatter.ofPattern(“yyyyMM/dd/HHmmssSSS”, Locale.CHINESE);
public static final ClientConfiguration DEFAULT_CLIENT_CONFIGURATION = new ClientConfiguration();
/**
* 进行图片上传
*/
public static BaseState uploadImg(CloudApiConfig cloudApiConfig, UploadImgConfig uploadImgConfig, MultipartFile file) {
if (file == null || file.isEmpty()) {
return new BaseState(false, 7);
}
String contentType = file.getContentType();
if (!contentType.matches(“^image/(?:png|jpg|jpeg|gif|bmp)$”)) {// 文件格式不匹配
return new BaseState(false, 8);
}
return upload(cloudApiConfig, uploadImgConfig, file);
}
/**
* 进行文件上传
* 返回值为BaseState是为了让前端ueditor能够识别
* 同时因为BaseState有返回上传后的url,能够满足业务需求
*/
public static BaseState upload(CloudApiConfig cloudApiConfig, UploadImgConfig uploadImgConfig, MultipartFile file) {
if (file == null || file.isEmpty()) {
return new BaseState(false, 7);
}
String fileName = file.getOriginalFilename();
if (!validSize(file.getSize(), uploadImgConfig.getMaxSize())) {
return new BaseState(false, 1);
}
OSSClient ossClient = null;
try {
String suffix = “.” + FilenameUtils.getExtension(fileName);
// 工程中可以有多个OSSClient,也可以只有一个OSSClient;OSSClient可以并发使用;OSS支持https,当您的安全需求更高时,可以使用https;OSSClient.shutdown之后不能再使用。
ossClient = new OSSClient(cloudApiConfig.getOssEndpoint(), cloudApiConfig.getAccessKeyId(),
cloudApiConfig.getAccessKeySecret(), DEFAULT_CLIENT_CONFIGURATION);
String dt = new StringBuilder()
.append(LocalDateTime.now().format(DATE_TIME_FORMATTER))
.append(RandomStringUtils.randomAlphabetic(6))
.append(suffix)
.toString();
ossClient.putObject(cloudApiConfig.getOssBucketName(), dt, file.getInputStream());
// 需要注意,这里的uploadImgConfig.getAccessUrlPrefix()
// 虽然是上传到OSS,但是很多情况下并不会直接通过OSS访问上传的文件
// 因为可能涉及跨域等其他问题,所以采用配置访问前缀拼接上oss路径的方式来避免此问题
String accessUrl = new StringBuilder()
.append(uploadImgConfig.getAccessUrlPrefix())
.append(“/”).append(dt).toString();
BaseState storageState = new BaseState(true);
storageState.putInfo(“size”, file.getSize());
storageState.putInfo(“title”, file.getName());
storageState.putInfo(“url”, accessUrl);
storageState.putInfo(“type”, suffix);
storageState.putInfo(“original”, “”);
return storageState;
} catch (Exception e) {
log.error(e.getMessage(), e);
} finally {
Optional.ofNullable(ossClient).ifPresent(OSSClient::shutdown);
}
return new BaseState(false, 6);
}
/**
* 校验文件大小
* @param dataLength dataLength
* @param maxSize maxSize
* @return boolean
*/
public static boolean validSize(long dataLength, long maxSize) {
return maxSize == -1 || dataLength <= maxSize;
}
}
Controller
package com.ruoyi.project.cloud.controller;
import com.baidu.ueditor.ActionEnter;
import com.ruoyi.project.cloud.config.CloudApiConfig;
import com.ruoyi.project.cloud.config.UploadImgConfig;
import com.ruoyi.project.cloud.util.OssUtils;
import lombok.extern.slf4j.Slf4j;
import net.sf.json.JSONException;
import org.apache.commons.collections4.CollectionUtils;
import org.springframework.web.bind.annotation.GetMapping;
import org.springframework.web.bind.annotation.PostMapping;
import org.springframework.web.bind.annotation.RequestMapping;
import org.springframework.web.bind.annotation.RestController;
import org.springframework.web.multipart.MultipartFile;
import org.springframework.web.multipart.support.StandardMultipartHttpServletRequest;
import javax.annotation.Resource;
import javax.servlet.http.HttpServletRequest;
import javax.servlet.http.HttpServletResponse;
import java.io.IOException;
import java.io.PrintWriter;
import java.util.List;
@Slf4j
@RestController
// 前端配置的访问地址,必须和这里的相同,这样才能正确获取到ueditor配置
@RequestMapping(“/ueditor”)
public class UeditorController {
@Resource
private UploadImgConfig uploadImgConfig;
@Resource
private CloudApiConfig cloudApiConfig;
/**
* 获取ueditor配置信息时会走此方法
* 由于ueditor并不能单独指定是通过那个URL获取配置
* 而是通过URL后面携带的action参数来进行识别
* 所以这里加上了if (“config”.equals(action))的判断
*/
@GetMapping
public void config(HttpServletRequest request, HttpServletResponse response) throws JSONException {
String action = request.getParameter(“action”);
if (“config”.equals(action)) {
response.setContentType(“application/json”);
String rootPath = request.getSession().getServletContext().getRealPath(“/”);
try {
ActionEnter actionEnter = new ActionEnter(request, rootPath);
String exec = actionEnter.exec();
PrintWriter writer = response.getWriter();
writer.write(exec);
writer.flush();
writer.close();
} catch (IOException e) {
log.error(“获取ueditor配置失败”);
}
}
}
/**
* 进行文件上传时
* post方式会走这个方法
* 这里并没有直接用JOSN.toJSONString方法来转换结果为json字符串
* 因为查看了转换后的结果为{“state”:true}
* 这样的json字符串是不能被前端ueditor正确解析的
* 所以采用了BaseState自己的toJSONString方法
*/
@PostMapping
public String upload(HttpServletRequest request) {
List<MultipartFile> files = ((StandardMultipartHttpServletRequest) request).getMultiFileMap().get(“upfile”);
MultipartFile file = CollectionUtils.isNotEmpty(files) ? files.get(0) : null;
return OssUtils.uploadImg(cloudApiConfig, uploadImgConfig, file).toJSONString();
}
}
六、使用
在需要用到的地方直接使用,myConfig是对ueditor的一些配置项进行自定义
<vue-ueditor-wrap v-model="这里是绑定的属性" :config="myConfig"></vue-ueditor-wrap>
在data里面配置myConfig
myConfig: {
// 编辑器不自动被内容撑高
autoHeightEnabled: false,
// 初始容器高度
initialFrameHeight: 400,
// 初始容器宽度
initialFrameWidth: ‘100%’,
// 这里的serverUrl,UEDITOR_HOME_URL用到的值就是在环境配置文件中统一设置的
serverUrl: process.env.VUE_APP_UEDITOR_SERVER_URL,
UEDITOR_HOME_URL: process.env.VUE_APP_UEDITOR_HOME_URL
}
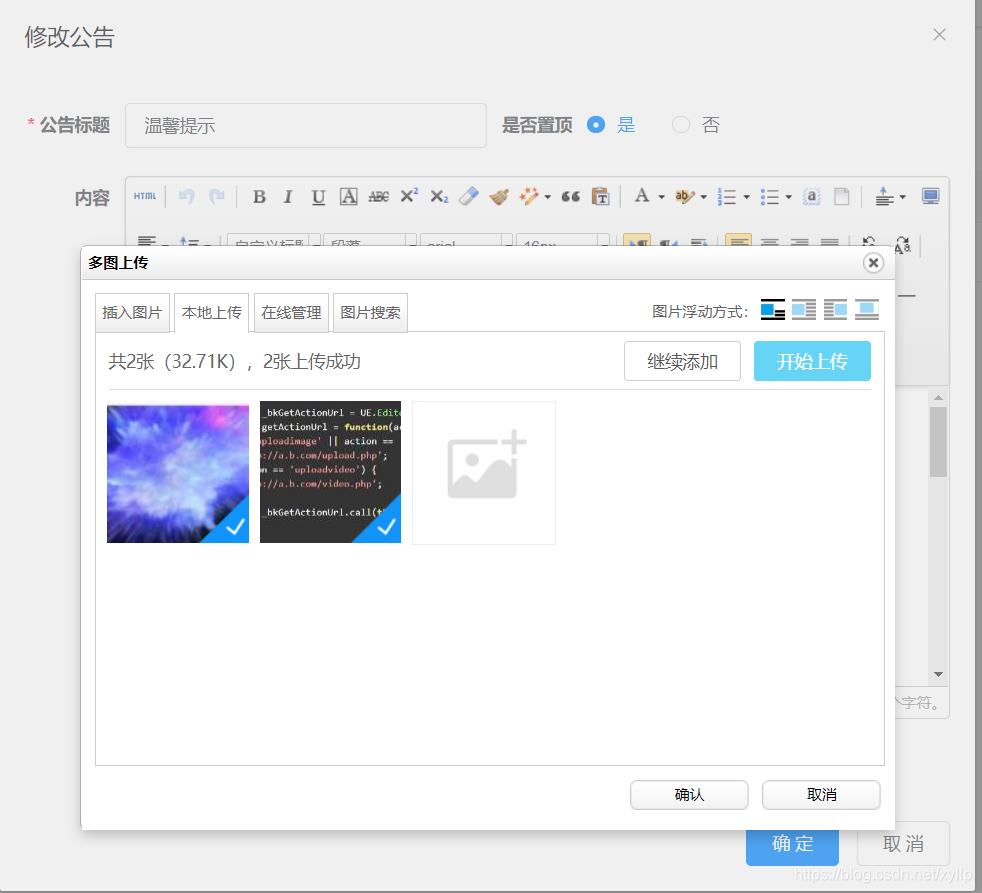
进行测试
问题总结
前端路径映射问题
在配置前端env文件时,建议路径加上相应的VUE_APP_BASE_API值
如:
VUE_APP_BASE_API = ‘/dev-api’
VUE_APP_UEDITOR_SERVER_URL = ‘/dev-api/ueditor’
1
2
假设没有环境标识前缀:VUE_APP_UEDITOR_SERVER_URL = ‘/ueditor’
那么部署后将会导致项目路径为/dev-api/xxxx,而ueditor的访问路径为/ueditor
这样将导致NGINX反向代理时需要多配置一个映射,多项目部署时,将导致冲突
后台打包问题
配置打包时引入本地jar,一定不要使用这种方式,如果你配置了多个resource,而其他的resource又包含了项目配置文件,那还好,如果像下面这样的话,那就只有一个字,坑
当 配 置 成 这 样 时 , 打 包 后 发 现 项 目 配 置 文 件 并 不 存 在 于 j a r 包 中 \color{red}{当配置成这样时,打包后发现项目配置文件并不存在于jar包中}当配置成这样时,打包后发现项目配置文件并不存在于jar包中
<build>
<resources>
<resource>
<directory>lib</directory>
<targetPath>/lib/</targetPath>
<includes>
<include>**/*.jar</include>
</includes>
</resource>
</resources>
</build>
正确的方式是使用< i n c l u d e S y s t e m S c o p e > t r u e < / i n c l u d e S y s t e m S c o p e > \color{red}{<includeSystemScope>true</includeSystemScope>}<includeSystemScope>true</includeSystemScope>
<build>
<finalName>${project.artifactId}</finalName>
<plugins>
<plugin>
<groupId>org.springframework.boot</groupId>
<artifactId>spring-boot-maven-plugin</artifactId>
<configuration>
<fork>true</fork> <!– 如果没有该配置,devtools不会生效 –>
<includeSystemScope>true</includeSystemScope>
</configuration>
</plugin>
</plugins>
</build>
图片访问路径问题
当配置了自己的accessUrlPrefix后,在config.json中的imageUrlPrefix一定要配置成空字符串,否则结果将是config.json中的前缀+自己配置的前缀,最后导致图片无法正常显示。
ueditor弹出窗被遮挡
找到ueditor.config.js的65行左右,修改zIndex的值大一些,这样就可以解决弹出窗被遮挡的问题
————————————————
版权声明:本文为CSDN博主「大叔熊猫」的原创文章,遵循CC 4.0 BY-SA版权协议,转载请附上原文出处链接及本声明。
原文链接:https://blog.csdn.net/xyllp/article/details/106311944