
一、背景
做前端的女朋友让我帮忙在远程虚拟机上安装MySQL数据库,根据我多年编程经验,这个应该是几分钟的事情,满口自信答应,结果还是遇到很多坑。阮一峰约莫说过:软件编程更多是一种应用能力,和基础科学研究是不同的。编程就是用已经有的砖头搭建起图纸上的高楼。
通过Xshell连接虚拟机,然后开始安装MySQL、排查问题、Navicat连接MySQL。
二、安装
sudo apt-get install mysql-server //服务端
sudo apt-get install mysql-client //客户端
sudo apt-get install libmysqlclient-dev //程序编译时链接的库
service mysql status //查看mysql运行状态
mysql -u root -p //登录mysql
#服务管理
#启动
sudo service mysql start
#停止
sudo service mysql stop
#重启
sudo service mysql restart
#进入管理员账户
sudo su
#首先使用以下命令删除MySQL服务器:
sudo apt-get remove mysql-server
#查看当前的数据库。
show databases;
三、解决安装过程中的报错问题
1.密码错误
问题:Access denied for user ‘root‘@‘localhost‘ (using password: YES)
解决办法:
(1)虚拟机cd到 /etc/mysql/mysql.conf.d 目录下,mysql8的相关配置在文件mysqld.cnf中。
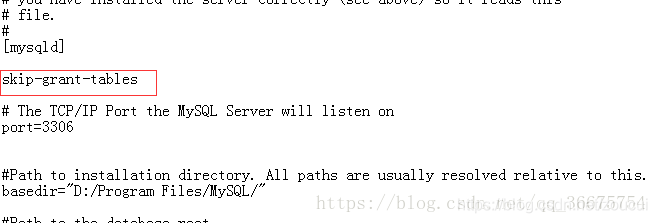
(2)vim mysqld.cnf 搜索 /mysqld 按 i 进入输入模式,在[mysqld]下输入 skip-grant-tables ,让mysql跳过密码验证
(3)重启mysql sudo service mysql restart。
(4)登录mysql,键入mysql –uroot –p;直接回车不需要输入密码(Enter)
(5)更新密码。update mysql.user set authentication_string=password(’123’) where user=’root’;
(6)flush privileges; 刷新数据库。此时报错语法不正确
2.修改密码语法错误
问题:ERROR 1064 (42000) You have an error in your SQL syntax; check the manual that corresponds to your MySQL server version for the right syntax to use near ‘password(‘123456’)’ at line 1
解决办法:
(1)MySQL8.0后请使用alter修改用户密码。ALTER USER ‘root’@’%’ IDENTIFIED BY ‘123’;
(2)此时报错 :ERROR 1290 (HY000): The MySQL server is running with the –skip-grant-tables option so it cannot execute this statement
3. skip-grant-tables无法修改密码
问题:ERROR 1290 (HY000): The MySQL server is running with the –skip-grant-tables option so it cannot execute this statement
解决办法:
(1)先执行:flush privileges;
(2)再执行修改密码命令,可以了
(3)报错:ERROR 1396 (HY000): Operation ALTER USER failed for ‘root’@’%’
4.MySQL8修改密码方法
借鉴 引用:
MySQL5.7和之前的用户修改密码方式:
mysql -uroot -e “Set password=password(‘123’);”
mysql -uroot -p123.com -e “use mysql;update user set authentication_string=password(‘456′) where user=’root’;”
update mysql.user set authentication_string=password(“123”) where user=’root’;
以上三种方法在MySQL8.0以后版本中将不能使用,如果使用了将会导致在正确修改密码是报如下错误:
mysql> ALTER USER ‘root’@’localhost’ IDENTIFIED WITH mysql_native_password BY ‘123’;
ERROR 1396 (HY000): Operation ALTER USER failed for ‘root’@’localhost’
如遇上以上问题请使用update语句先清空authentication_string字段,然后再修改密码即可
update user set authentication_string=” where user=’root’;
ALTER USER ‘root’@’localhost’ IDENTIFIED WITH mysql_native_password BY ‘你的密码’;
所以特别提醒童鞋们:
MySQL8.0后请使用alter修改用户密码,因为在MySQL8.0以后的加密方式为caching_sha2_password,如果使用update修改密码会给user表中root用户的authentication_string字段下设置newpassowrd值,当再使用alter user ‘root’@’localhost’ identified by ‘newpassword’修改密码时会一直报错,必须清空后再修改,因为authentication_string字段下只能是MySQL加密后的43位字符串密码,其他的会报格式错误,所以在MySQL8.0以后能修改密码的方法只能是:ALTER USER ‘root’@’localhost’ IDENTIFIED WITH mysql_native_password BY ‘你的密码’;
5.打开MySQL远程连接
(1)虚拟机cd到 /etc/mysql/mysql.conf.d 目录下,mysql 8 的相关配置在文件mysqld.cnf中。
(2) 因为默认3306端口只允许本地访问的,注释掉这行 #bind-address = 127.0.0.1
(3)关闭ubuntu的防火墙
sudo ufw status # 查看防火墙状态
sudo ufw enable #打开防火墙
sudo ufw disable #关闭防火墙
三、总结
直接定位具体MySQL版本、具体问题,就不会出现因为版本不一样,导致运行命令不同这个问题。 如果一开始直接搜索:mysql8 修改密码 可能就不会出现过程中的那些问题。
————————————————
版权声明:本文为CSDN博主「fang·up·ad」的原创文章,遵循CC 4.0 BY-SA版权协议,转载请附上原文出处链接及本声明。
原文链接:https://blog.csdn.net/qq_22310551/article/details/114964690