
一、调用流程
官方文档:企业微信
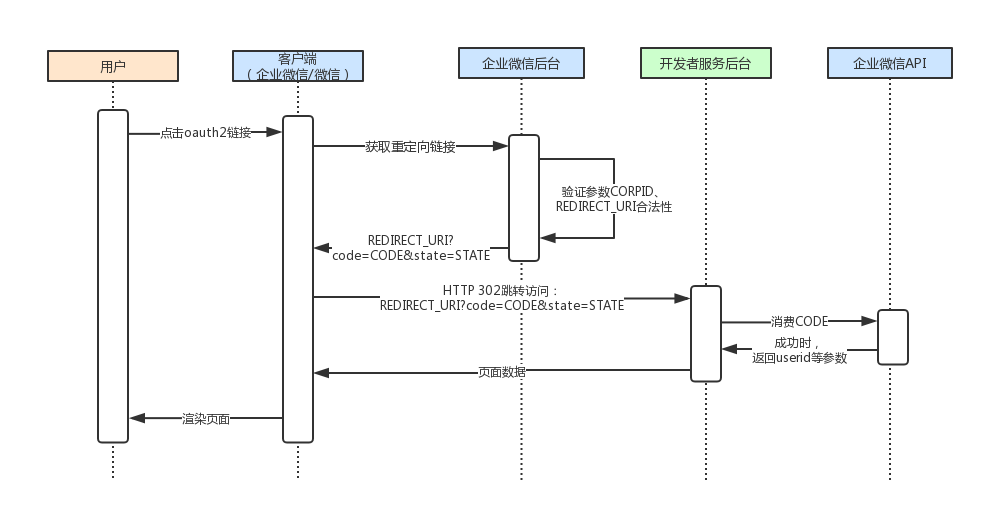
二、流程参考
三、准备过程
1. 申请企业微信
个人也是可以申请的,只是没有企业认证
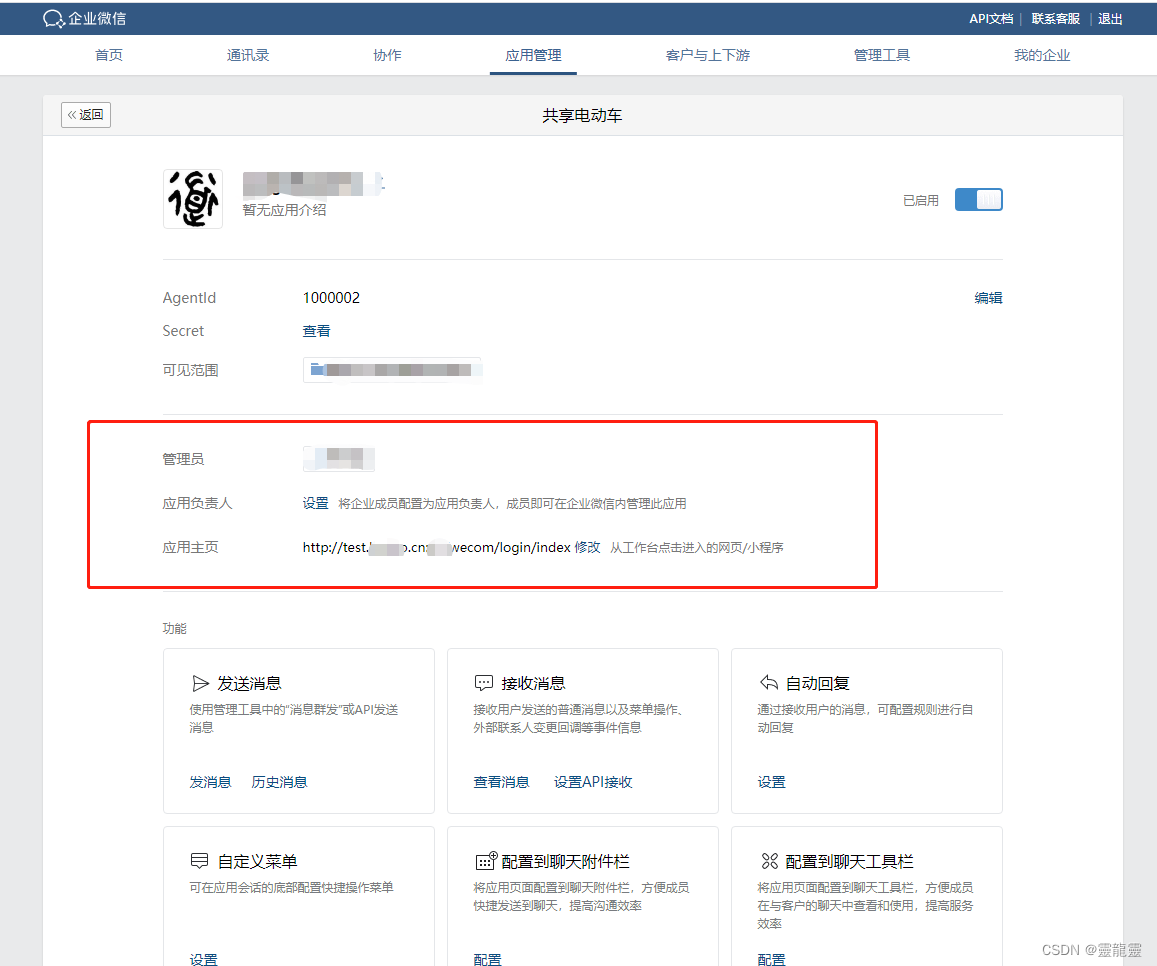
2. 创建内部应用

3. 设置应用路径
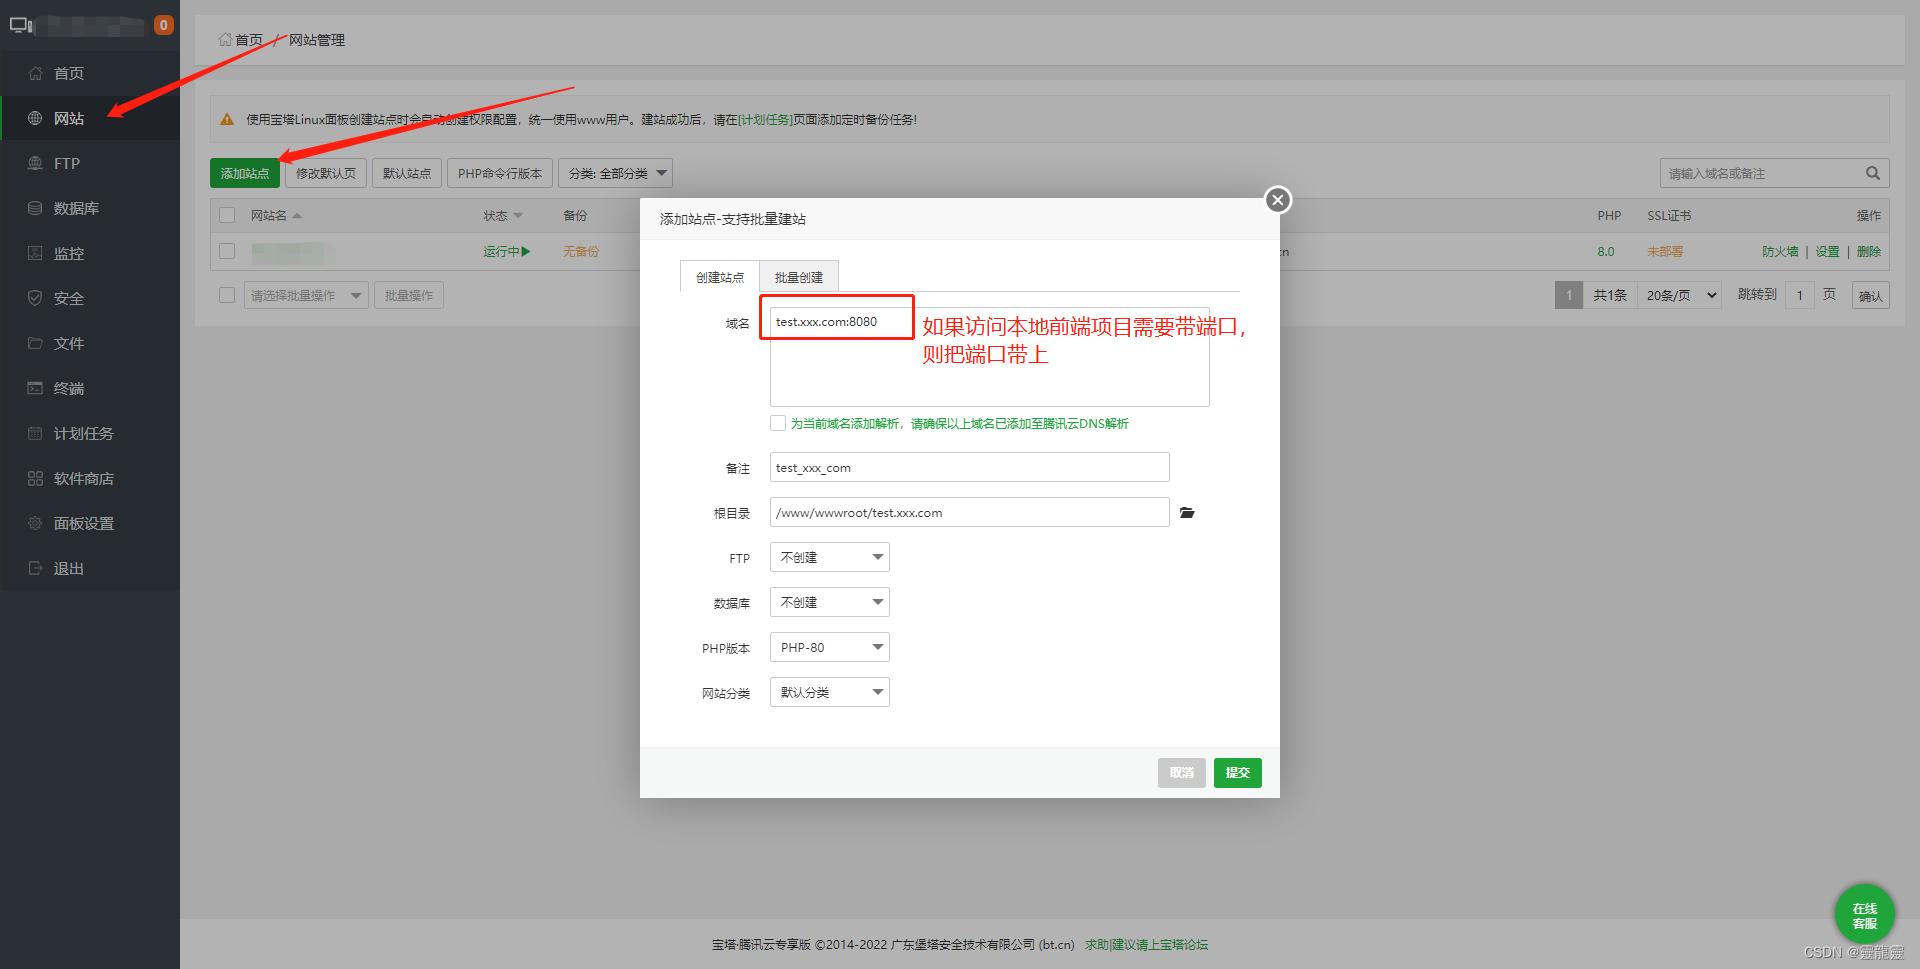
4. 设置可信域名
这边结合腾讯服务器和宝塔
然后前往企业微信刚刚创建的应用里面设置可信域名,填好域名,下载文件,上传到宝塔站点根目录再点确定
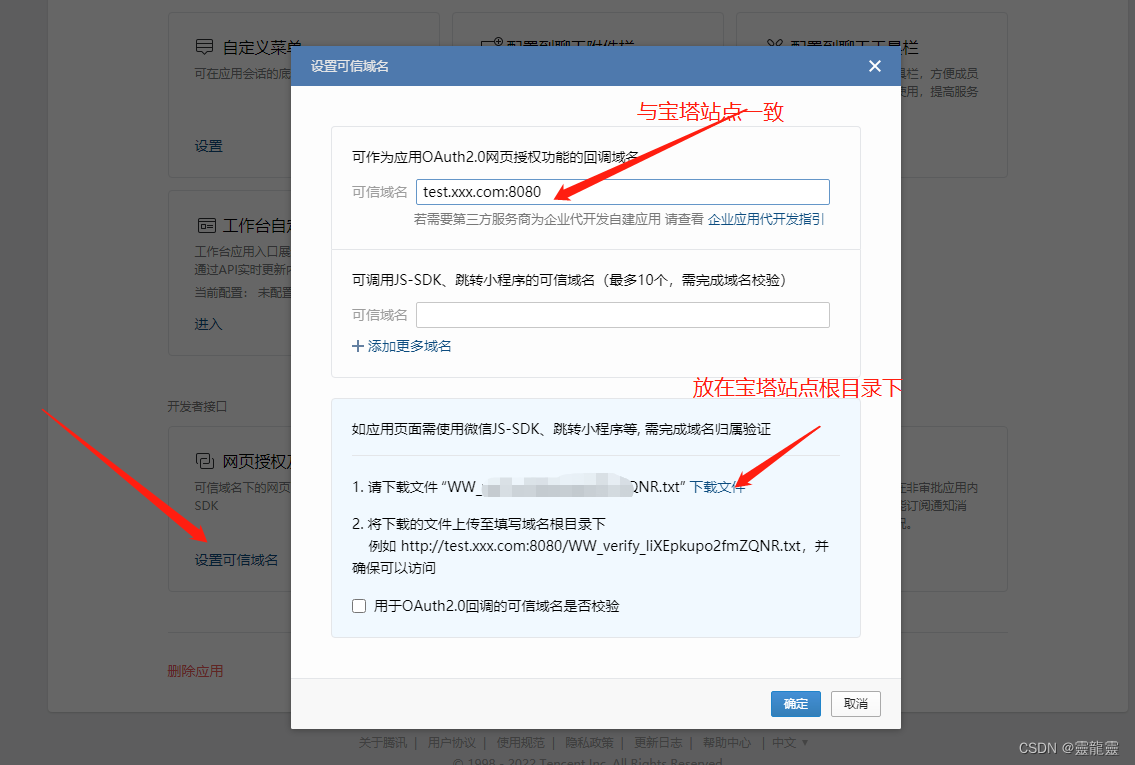
把验证文件放到站点根目录下
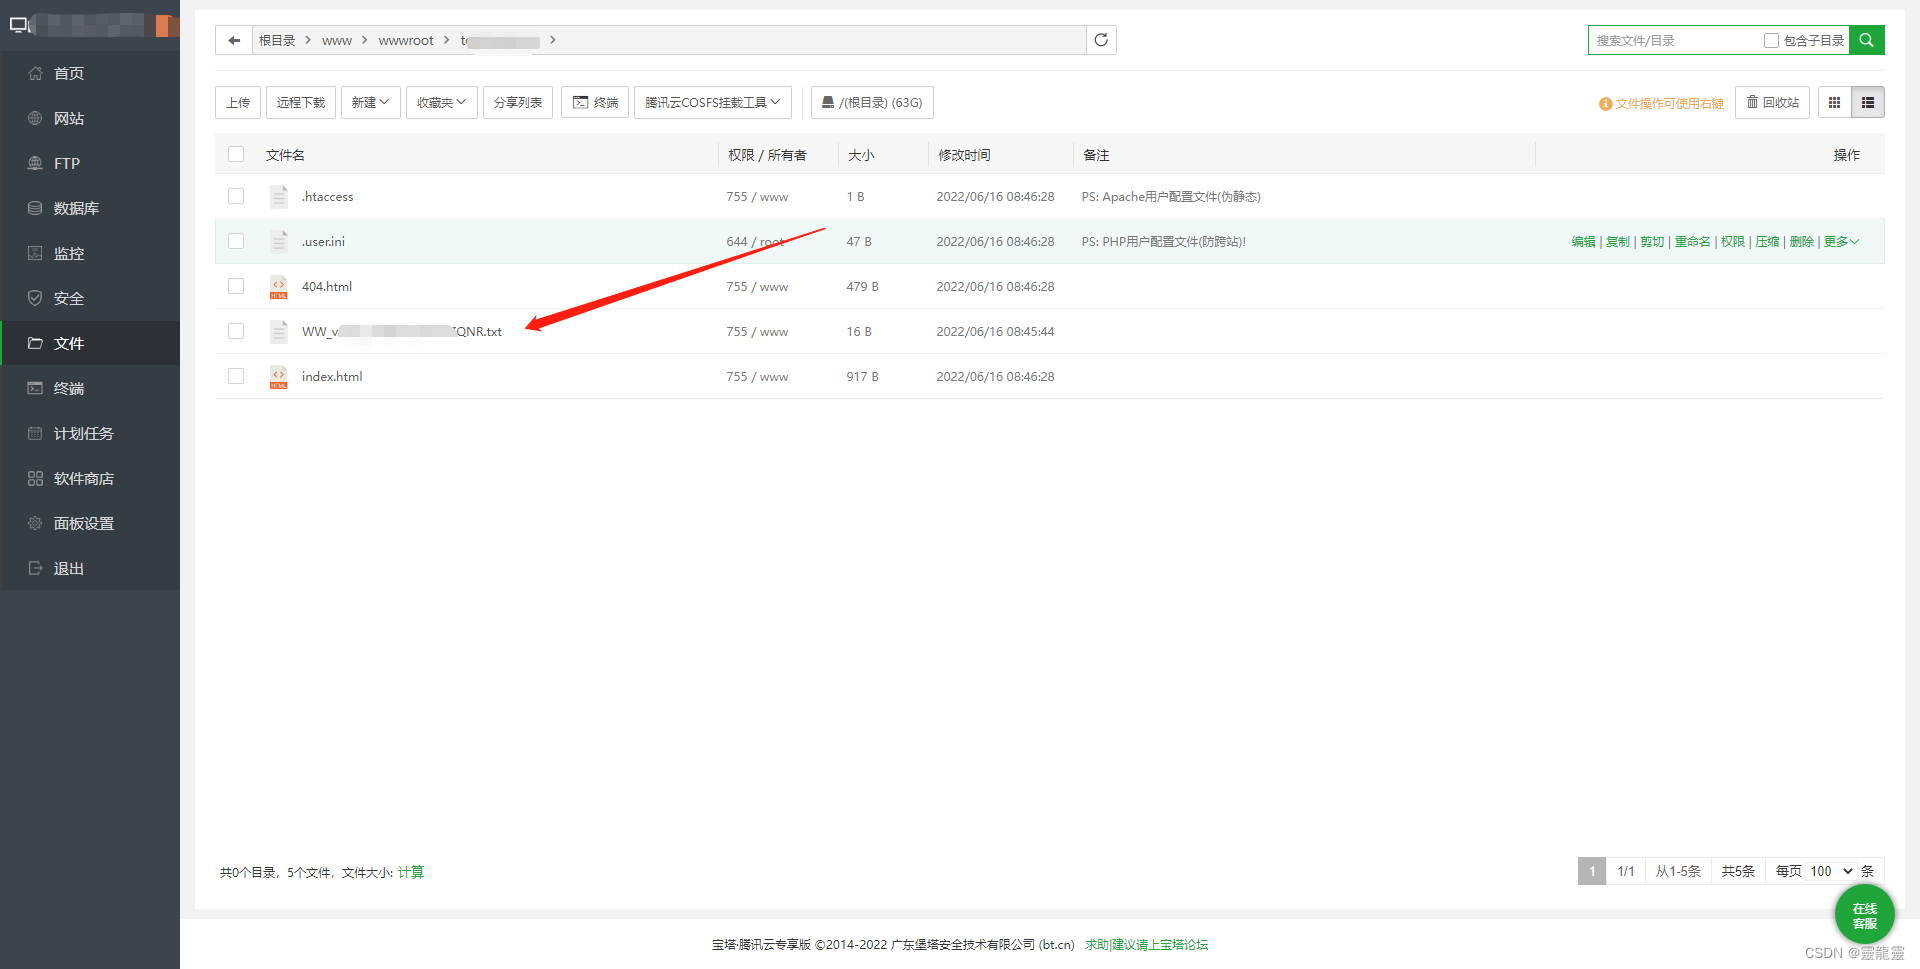
然后企业微信中点击确定即可。
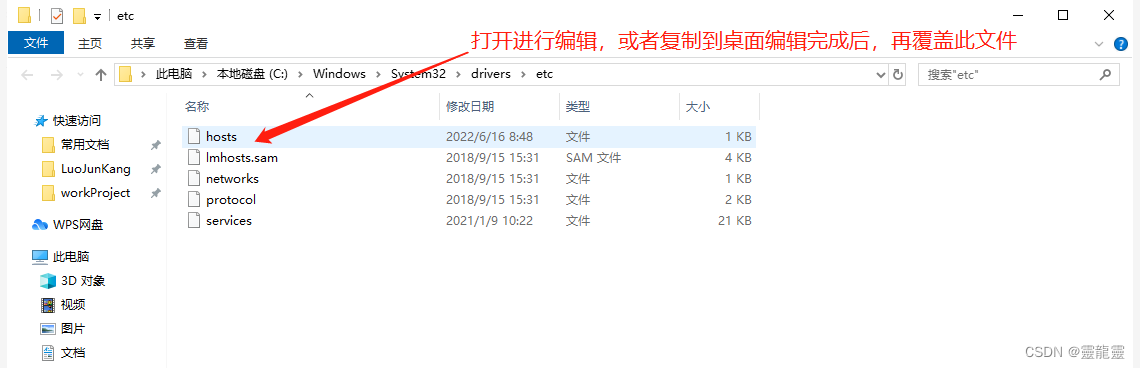
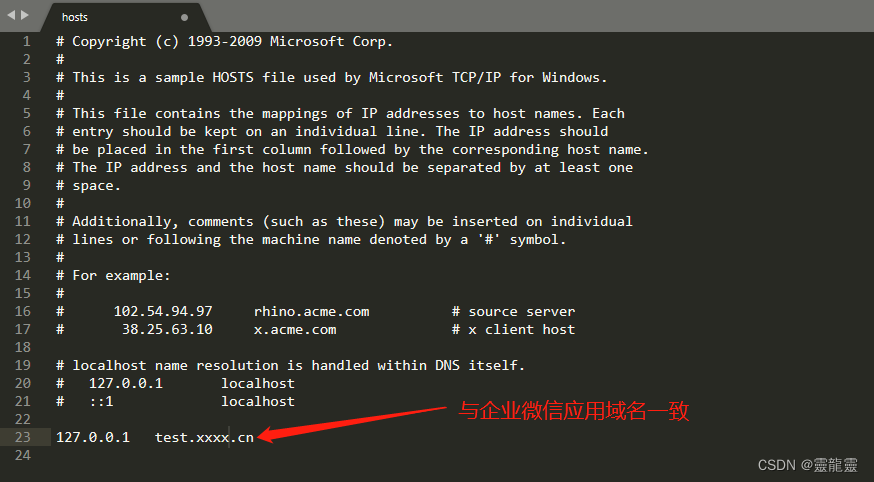
5. 本地调试
通过win+R唤起运行框输入: C:\Windows\System32\drivers\etc

四、代码展示
1. 前端代码
1.1 调用的方法js:src\api\wcLogin.js
import request from ‘@/utils/request’
export function oauthUrl(query) {
return request({
url: ‘/wecom/oauthUrl’,
method: ‘get’,
params: query
})
}
export function oauthUser(query) {
return request({
url: ‘/wecom/oauthUser’,
method: ‘get’,
params: query
})
}
export function queryString(name) {
var reg = new RegExp(‘(^|&)’ + name + ‘=([^&]*)(&|$)’, ‘i’);
var r = window.location.search.substr(1).match(reg);
if (r != null) {
return unescape(r[2]);
}
return null;
}
1.2 应用访问入口页面:src\views\login\index.vue
<template>
<div id=”loader-wrapper”>
<div id=”loader”></div>
<div class=”loader-section section-left”></div>
<div class=”loader-section section-right”></div>
<div class=”load_title”>正在加载系统资源,请耐心等待</div>
</div>
</template>
<script>
import { oauthUrl } from “@/api/wecom/wcLogin”;
import { getToken } from “@/utils/auth”;
export default {
data() {
return {
url: window.location.href,
};
},
created() {
this.getOauthUrl();
},
computed: {},
methods: {
getOauthUrl() {
// 判断是否登录
if (getToken()) {
// 已登录的直接跳转到目的地
window.location.href =
window.location.protocol +
“//” +
window.location.host +
“/index”;
} else {
// window.location 对象用于获得当前页面的地址 (URL),并把浏览器重定向到新的页面
let oauthCallback =
window.location.protocol +
“//” +
window.location.host +
“/wecom/callback/index”;
// agentId:企业微信 应用ID
let params = {
oauthCallback: oauthCallback,
agentId: 1000002,
};
oauthUrl(params).then((res) => {
// alert(res.data);
window.location.href = res.data;
});
}
},
},
};
</script>
1.3 微信授权回调页面:src\views\callback\index.vue
<template>
<div id=”loader-wrapper”>
<div id=”loader”></div>
<div class=”loader-section section-left”></div>
<div class=”loader-section section-right”></div>
<div class=”load_title”>正在加载系统资源,请耐心等待</div>
</div>
</template>
<script>
import { oauthUser, queryString } from “@/api/wcLogin”;
export default {
created() {
this.getOauthUser();
},
computed: {
url() {
return window.location.href;
},
},
methods: {
getOauthUser() {
// agentId:企业微信 应用ID
let params = {
code: queryString(“code”),
agentId: 1000002,
baseUrl: window.location.protocol + “//” + window.location.host,
};
oauthUser(params).then((res) => {
// console.log(res.data);
window.location.href = res.data;
});
},
},
};
</script>
2. 后端代码
2.1 引用第三方企业微信SDK
第三方企业微信SDK文档:binarywang/WxJava
<!–第三方企业微信SDK–>
<dependency>
<groupId>com.github.binarywang</groupId>
<artifactId>weixin-java-cp</artifactId>
<version>4.3.0</version>
</dependency>
<!–读取配置–>
<dependency>
<groupId>org.springframework.boot</groupId>
<artifactId>spring-boot-configuration-processor</artifactId>
<optional>true</optional>
</dependency>
<!–lombok–>
<dependency>
<groupId>org.projectlombok</groupId>
<artifactId>lombok</artifactId>
</dependency>
2.2 配置文件
wechat:
cp:
# 测试企业
corpId: ww8917f1xxxx7e3xxx
appConfigs:
– agentId: 1000002
secret: xYxxxxxyxnxxxxxgQxxxxxIxxwVxxxxxixxxx5xxxxx
// 没有配置可以默认xxx
token: xxx
aesKey: xxx
logging:
level:
com.github.binarywang.demo.wx.cp: DEBUG
me.chanjar.weixin: DEBUG
2.3 配置类
package com.leo.wecom.config;
import com.google.common.collect.Maps;
import lombok.val;
import me.chanjar.weixin.cp.api.WxCpService;
import me.chanjar.weixin.cp.api.impl.WxCpServiceImpl;
import me.chanjar.weixin.cp.config.impl.WxCpDefaultConfigImpl;
import me.chanjar.weixin.cp.message.WxCpMessageRouter;
import org.springframework.beans.factory.annotation.Autowired;
import org.springframework.boot.context.properties.EnableConfigurationProperties;
import org.springframework.context.annotation.Configuration;
import javax.annotation.PostConstruct;
import java.util.Map;
import java.util.stream.Collectors;
/**
*
* @author leo
* @date 2022/6/16 14:15
*/
@Configuration
@EnableConfigurationProperties(WxCpProperties.class)
public class WxCpConfiguration {
private final WxCpProperties properties;
private static Map<Integer, WxCpMessageRouter> routers = Maps.newHashMap();
private static Map<Integer, WxCpService> cpServices = Maps.newHashMap();
@Autowired
public WxCpConfiguration(WxCpProperties properties) {
this.properties = properties;
}
public static WxCpService getCpService(Integer agentId) {
return cpServices.get(agentId);
}
@PostConstruct
public void initServices() {
cpServices = this.properties.getAppConfigs().stream().map(a -> {
val configStorage = new WxCpDefaultConfigImpl();
configStorage.setCorpId(this.properties.getCorpId());
configStorage.setAgentId(a.getAgentId());
configStorage.setCorpSecret(a.getSecret());
configStorage.setToken(a.getToken());
configStorage.setAesKey(a.getAesKey());
val service = new WxCpServiceImpl();
service.setWxCpConfigStorage(configStorage);
routers.put(a.getAgentId(), this.newRouter(service));
return service;
}).collect(Collectors.toMap(service -> service.getWxCpConfigStorage().getAgentId(), a -> a));
}
/**
* 可以配置对应的监听事件
* @param wxCpService
* @return
*/
private WxCpMessageRouter newRouter(WxCpService wxCpService) {
final val newRouter = new WxCpMessageRouter(wxCpService);
// // 记录所有事件的日志 (异步执行)
// newRouter.rule().handler(this.logHandler).next();
return newRouter;
}
}
package com.leo.wecom.config;
import com.leo.wecom.utils.JsonUtils;
import lombok.Getter;
import lombok.Setter;
import org.springframework.boot.context.properties.ConfigurationProperties;
import java.util.List;
/**
* @author leo
* @date 2022/6/16 14:05
*/
@Getter
@Setter
@ConfigurationProperties(prefix = “wechat.cp”)
public class WxCpProperties {
/**
* 设置企业微信的corpId
*/
private String corpId;
private List<AppConfig> appConfigs;
@Getter
@Setter
public static class AppConfig {
/**
* 设置企业微信应用的AgentId
*/
private Integer agentId;
/**
* 设置企业微信应用的Secret
*/
private String secret;
/**
* 设置企业微信应用的token
*/
private String token;
/**
* 设置企业微信应用的EncodingAESKey
*/
private String aesKey;
}
@Override
public String toString() {
return JsonUtils.toJson(this);
}
}
package com.leo.wecom.utils;
import com.fasterxml.jackson.annotation.JsonInclude.Include;
import com.fasterxml.jackson.core.JsonProcessingException;
import com.fasterxml.jackson.databind.ObjectMapper;
import com.fasterxml.jackson.databind.SerializationFeature;
/**
* @author leo
*/
public class JsonUtils {
private static final ObjectMapper JSON = new ObjectMapper();
static {
JSON.setSerializationInclusion(Include.NON_NULL);
JSON.configure(SerializationFeature.INDENT_OUTPUT, Boolean.TRUE);
}
public static String toJson(Object obj) {
try {
return JSON.writeValueAsString(obj);
} catch (JsonProcessingException e) {
e.printStackTrace();
}
return null;
}
}
2.4 controller
package com.leo.wecom.controller;
import com.alibaba.fastjson.JSONObject;
import com.leo.wecom.config.WxCpConfiguration;
import com.leo.wecom.exception.ServiceException;
import com.leo.wecom.utils.Md5Util;
import com.leo.wecom.domain.AjaxResult;
import me.chanjar.weixin.common.error.WxErrorException;
import me.chanjar.weixin.cp.api.WxCpService;
import me.chanjar.weixin.cp.bean.WxCpOauth2UserInfo;
import org.springframework.web.bind.annotation.*;
import org.springframework.web.client.RestTemplate;
import java.text.SimpleDateFormat;
import java.util.Date;
/**
* @author leo
* @date 2022/6/16 14:59
*/
@RestController
@RequestMapping(“/wecom”)
public class GarSevWeComController {
/**
* 生成静默授权链接
* @param agentId 应用ID
* @param oauthCallback 待跳转链接
* @return 链接Url
*/
@CrossOrigin
@ResponseBody
@GetMapping(“/oauthUrl”)
public AjaxResult oauthUrl(@RequestParam(“agentId”) Integer agentId, @RequestParam(“oauthCallback”) String oauthCallback) {
WxCpService wxCpService = WxCpConfiguration.getCpService(agentId);
// snsapi_base:静默授权,可获取成员的基础信息(UserId与DeviceId);
String authorizationUrl = wxCpService.getOauth2Service().buildAuthorizationUrl(oauthCallback, null, “snsapi_base”);
if (!””.equals(authorizationUrl)) {
return AjaxResult.success(“操作成功”,authorizationUrl);
}
return AjaxResult.error();
}
/**
* 通过core获取员工信息
* @param agentId 应用ID
* @param code 微信授权core
* @return 员工userId = 员工工号
* @throws Exception 捕捉异常
*/
@CrossOrigin
@ResponseBody
@GetMapping(“/oauthUser”)
public AjaxResult oauthUser(@RequestParam(“agentId”) Integer agentId, @RequestParam(“code”) String code, @RequestParam(“baseUrl”) String baseUrl) throws Exception {
WxCpService wxCpService = WxCpConfiguration.getCpService(agentId);
WxCpOauth2UserInfo res = wxCpService.getOauth2Service().getUserInfo(code);
String userId = res.getUserId();
if (“”.equals(userId)) {
return AjaxResult.error();
}
String ssoUrl = getSsoUrl(baseUrl, userId);
if (!””.equals(ssoUrl)) {
return AjaxResult.success(“操作成功”,ssoUrl);
}
return AjaxResult.error();
}
public String getToken(String userName){
SimpleDateFormat sdf= new SimpleDateFormat(“yyyyMMddHH”);
String now = sdf.format(new Date());
String key = “leo_cloud_2022”;
Md5Util md5Util = new Md5Util();
String sign = md5Util.md5(userName + “|” + key + “|” + now);
String tokenUrl = “http://127.0.0.1:8080/leo/getSsoToken?userName=”
+ userName + “&sign=” + sign;
RestTemplate client = new RestTemplate();
String response = client.getForObject(tokenUrl, String.class);
JSONObject jsonObject = JSONObject.parseObject(response);
if(“200”.equals(jsonObject.getString(“code”))){
String data = jsonObject.getString(“data”);
jsonObject = JSONObject.parseObject(data);
return jsonObject.getString(“access_token”);
}else{
System.out.println(“获取token错误: “+response);
throw new ServiceException(response);
}
}
public String getSsoUrl(String baseUrl, String userName){
if(“admin”.equals(userName)){
throw new ServiceException(“admin管理员不允许单点登录”);
}
//不足6位前面补零
try{
StringBuilder userNameBuilder = new StringBuilder(userName);
while(userNameBuilder.length()<6){
userNameBuilder.insert(0, “0”);
}
userName = userNameBuilder.toString();
}catch(Exception e){
e.printStackTrace();
}
String token = this.getToken(userName);
String url = baseUrl + “/login?userName=” + userName + “&ssoToken=” + token + “&gotoUrl=/index”;
return url;
}
}
package com.leo.wecom.utils;
import java.security.MessageDigest;
import java.security.NoSuchAlgorithmException;
public class Md5Util {
public static void main(String[] args){
String str = new Md5Util().md5(“admin”);
System.out.println(str);
}
/**利用MD5进行加密
* @param str 待加密的字符串
* @return 加密后的字符串
*/
public String md5(String str){
try {
MessageDigest md = MessageDigest.getInstance(“MD5”);
md.update(str.getBytes());
byte b[] = md.digest();
int i;
StringBuffer buf = new StringBuffer(“”);
for (int offset = 0; offset < b.length; offset++) {
i = b[offset];
if (i < 0)
i += 256;
if (i < 16)
buf.append(“0”);
buf.append(Integer.toHexString(i));
}
//32位加密
return buf.toString();
// 16位的加密
//return buf.toString().substring(8, 24);
} catch (NoSuchAlgorithmException e) {
e.printStackTrace();
return null;
}
}
}
————————————————
版权声明:本文为CSDN博主「靈龍靈」的原创文章,遵循CC 4.0 BY-SA版权协议,转载请附上原文出处链接及本声明。
原文链接:https://blog.csdn.net/weixin_43372858/article/details/125328326