在实际软件开发中,为了代码的规范化管理,我们依赖各种版本工具来控制软件代码的版本。Git作为新一代的版本控制工具,现在已经很流行了,很大原因是Github的流行。但在Github上要创建私有项目要购买服务,并且我们也不想让私有的代码或文档放到我们无法控制的公共平台上。所以建立一个内部使用的类似Github的平台将会极大方便代码的管理。
在市场上,类似Github的平台工具有很多,比如Gitlab, Gogs, Gitea等等。由于Gitlab太占用内存资源,Gogs经过查询,大家对它评价不是很好,所以被我排除了,但是基于Go开发的Gitea的评价貌似不错,又免费开源、内存占用很低。所以,我就搭建了基于Gitea的版本控制系统,编写本文以备以后查阅。
-
我的操作系统是: Ubuntu 16.04 LTS
-
我的IP/域名: http://www.xyz.com(假的)
-
Git版本: git version 2.7.4
本文以在Ahezime上发布: https://ahezime.com/blog/post/20190005
Gitea官方安装方法
https://docs.gitea.io/en-us/install-from-binary/
Gitea作为Linux系统服务
https://docs.gitea.io/en-us/linux-service/
/etc/systemd/system/gitea.service文件内容:
[Unit]
Description=Gitea (Git with a cup of tea)
After=syslog.target
After=network.target
#After=mysqld.service
#After=postgresql.service
#After=memcached.service
#After=redis.service

[Service]
# Modify these two values and uncomment them if you have
# repos with lots of files and get an HTTP error 500 because
# of that
###
#LimitMEMLOCK=infinity
#LimitNOFILE=65535
RestartSec=2s
Type=simple
User=git
Group=git
WorkingDirectory=/var/lib/gitea/
ExecStart=/usr/local/bin/gitea web -c /etc/gitea/app.ini
Restart=always
Environment=USER=git HOME=/home/git GITEA_WORK_DIR=/var/lib/gitea
# If you want to bind Gitea to a port below 1024 uncomment
# the two values below
###
#CapabilityBoundingSet=CAP_NET_BIND_SERVICE
#AmbientCapabilities=CAP_NET_BIND_SERVICE

[Install]
WantedBy=multi-user.target
如果要用到MySQL,就打开After=mysqld.service,其他保持默认值。
启动服务:
sudo systemctl enable gitea
sudo systemctl start gitea
查看服务状态:
sudo service gitea status
下面是按照官方文档操作,服务没起来时的状态:
● gitea.service - Gitea (Git with a cup of tea)
   Loaded: loaded (/etc/systemd/system/gitea.service; enabled; vendor preset: enabled)
   Active: activating (auto-restart) (Result: exit-code) since Sun 2019-01-06 09:36:23 UTC
  Process: 12701 ExecStart=/usr/local/bin/gitea web -c /etc/gitea/app.ini (code=exited, st
 Main PID: 12701 (code=exited, status=1/FAILURE)

Jan 06 09:36:23 ahezime systemd[1]: gitea.service: Main process exited, code=exited, statu
Jan 06 09:36:23 ahezime systemd[1]: gitea.service: Unit entered failed state.
Jan 06 09:36:23 ahezime systemd[1]: gitea.service: Failed with result 'exit-code'.
lines 1-9/9 (END)
通过journalctl查看进程日志:
journalctl -b 0 -u gitea
发现错误如下:
Jan 06 09:43:15 ahezime gitea[18618]: 2019/01/06 09:43:15 [W] Custom config '/etc/gitea/app.ini' not found, ignore this if you're running first time
Jan 06 09:43:15 ahezime gitea[18618]: 2019/01/06 09:43:15 [...s/setting/setting.go:808 NewContext()] [E] Failed to create '/home/git/.ssh': mkdir /home/git: permission denied
Jan 06 09:43:15 ahezime systemd[1]: gitea.service: Main process exited, code=exited, status=1/FAILURE
Jan 06 09:43:15 ahezime systemd[1]: gitea.service: Unit entered failed state.
Jan 06 09:43:15 ahezime systemd[1]: gitea.service: Failed with result 'exit-code'.
Jan 06 09:43:17 ahezime systemd[1]: gitea.service: Service hold-off time over, scheduling restart.
Jan 06 09:43:17 ahezime systemd[1]: Stopped Gitea (Git with a cup of tea).
Jan 06 09:43:17 ahezime systemd[1]: Started Gitea (Git with a cup of tea).
原来是少了一个文件和目录,创建文件和目录并将权限赋给git用户:
chown root:git /etc/gitea
chmod 770 /etc/gitea

touch /etc/gitea/app.ini
chown root:git /etc/gitea/app.ini
chmod 770 /etc/gitea/app.ini
等安装完成后可以再把权限收回。
再来启动下gitea系统服务:
systemctl start gitea
启动后的正常状态:
● gitea.service - Gitea (Git with a cup of tea)
   Loaded: loaded (/etc/systemd/system/gitea.service; enabled; vendor preset: enabled)
   Active: active (running) since Sun 2019-01-06 10:57:05 UTC; 42s ago
 Main PID: 19362 (gitea)
    Tasks: 7
   Memory: 29.5M
      CPU: 211ms
   CGroup: /system.slice/gitea.service
           └─19362 /usr/local/bin/gitea web -c /etc/gitea/app.ini

Jan 06 10:57:05 ahezime gitea[19362]: 2019/01/06 10:57:05 [I] Gitea v1.5.0 built with: bi
Jan 06 10:57:05 ahezime gitea[19362]: 2019/01/06 10:57:05 [I] Log Mode: Console(Info)
Jan 06 10:57:05 ahezime gitea[19362]: 2019/01/06 10:57:05 [I] XORM Log Mode: Console(Info
Jan 06 10:57:05 ahezime gitea[19362]: 2019/01/06 10:57:05 [I] Cache Service Enabled
Jan 06 10:57:05 ahezime gitea[19362]: 2019/01/06 10:57:05 [I] Session Service Enabled
Jan 06 10:57:05 ahezime gitea[19362]: 2019/01/06 10:57:05 [I] SQLite3 Supported
Jan 06 10:57:05 ahezime gitea[19362]: 2019/01/06 10:57:05 [I] Run Mode: Development
Jan 06 10:57:05 ahezime gitea[19362]: 2019/01/06 10:57:05 Serving [::]:3000 with pid 1936
Jan 06 10:57:05 ahezime gitea[19362]: 2019/01/06 10:57:05 [I] Listen: http://0.0.0.0:3000
Jan 06 10:57:18 ahezime systemd[1]: Started Gitea (Git with a cup of tea).
如果Gitea是安装在本机,在浏览器中输入地址http://www.xyz:3000,便可以看到首页了。
安装MySQL Server
见 远程连接Linux下MySQL服务器 教程 https://rayxyz.github.io/tech/2017/05/13/connect-remote-linux-mysql-server.html
新建gitea数据库
Web端初始化安装gitea
浏览器打开 http://www.xyz:3000 (此处为你自己的ip/域名+端口)
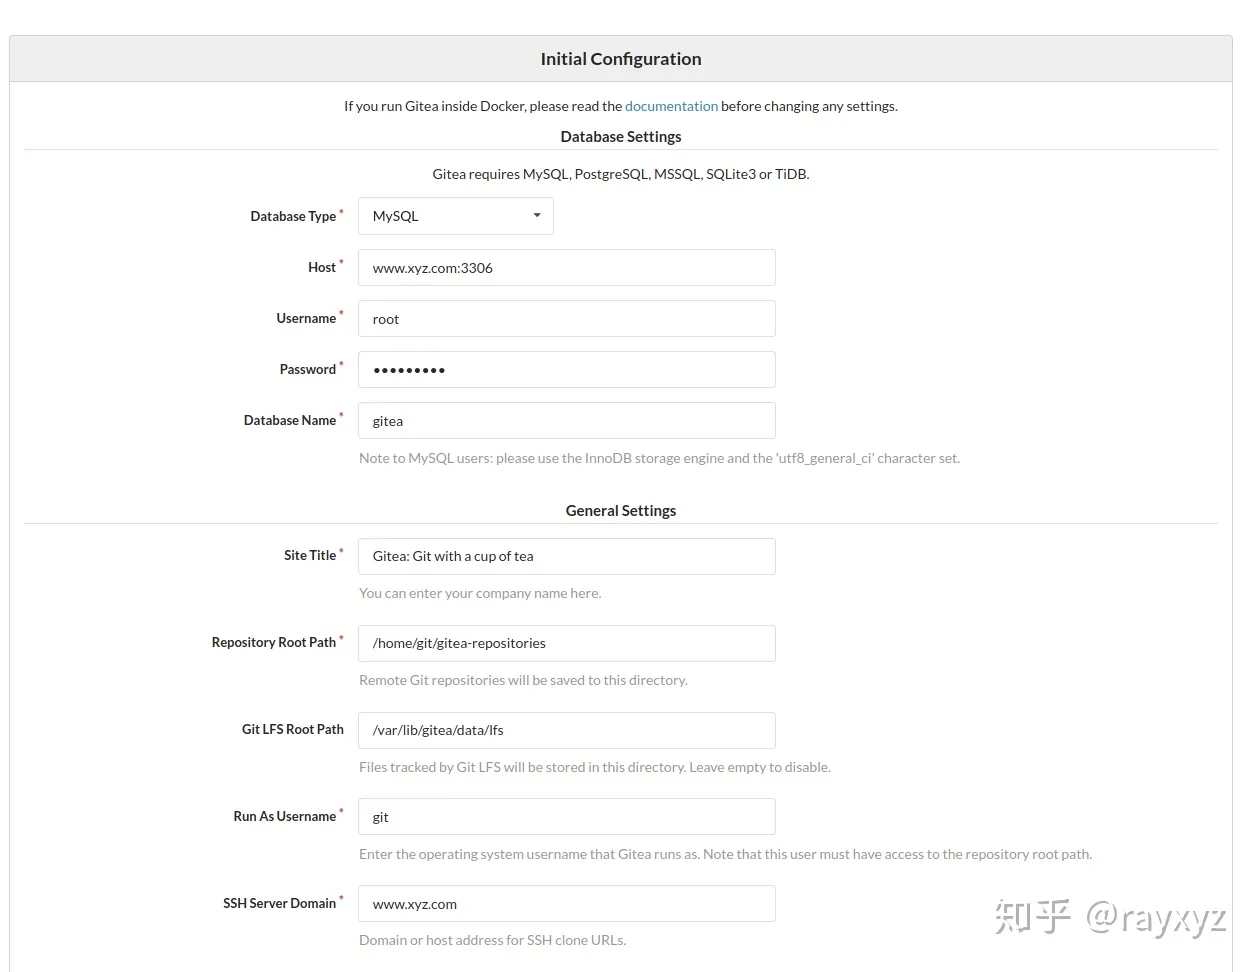
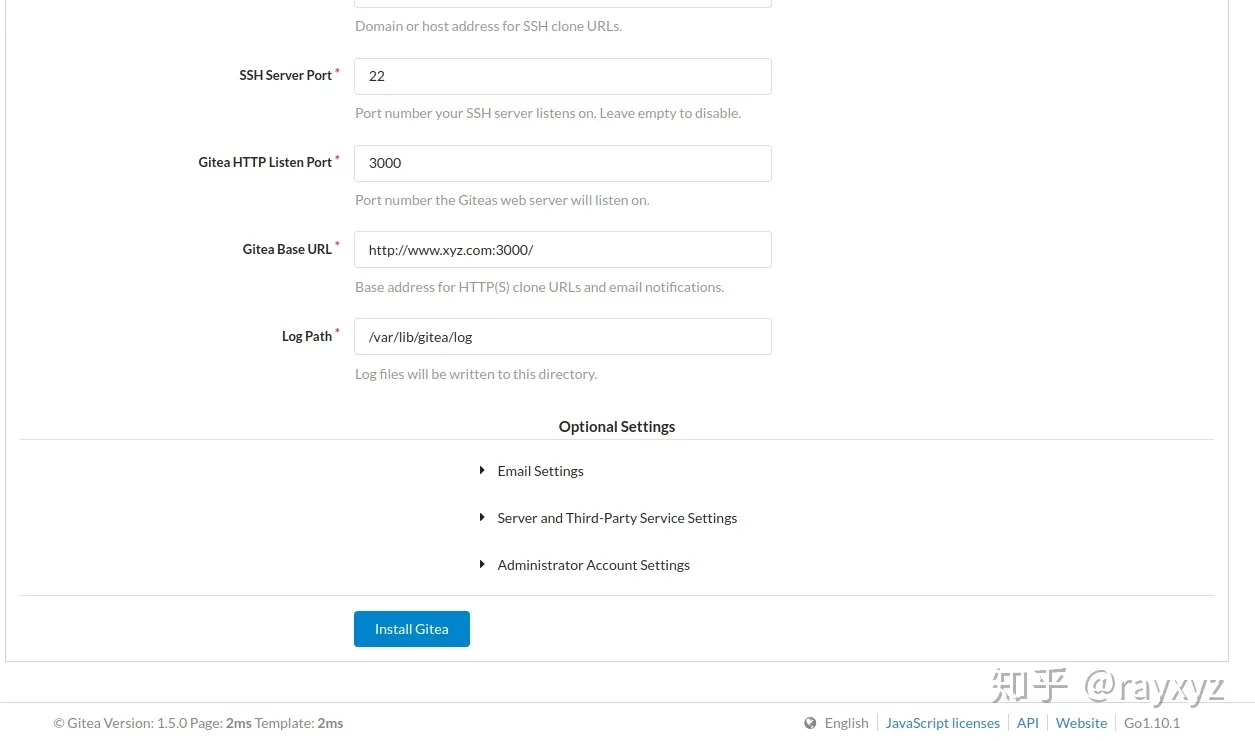
各个参数填好后,点击 'Install Gitea' 按钮安装。
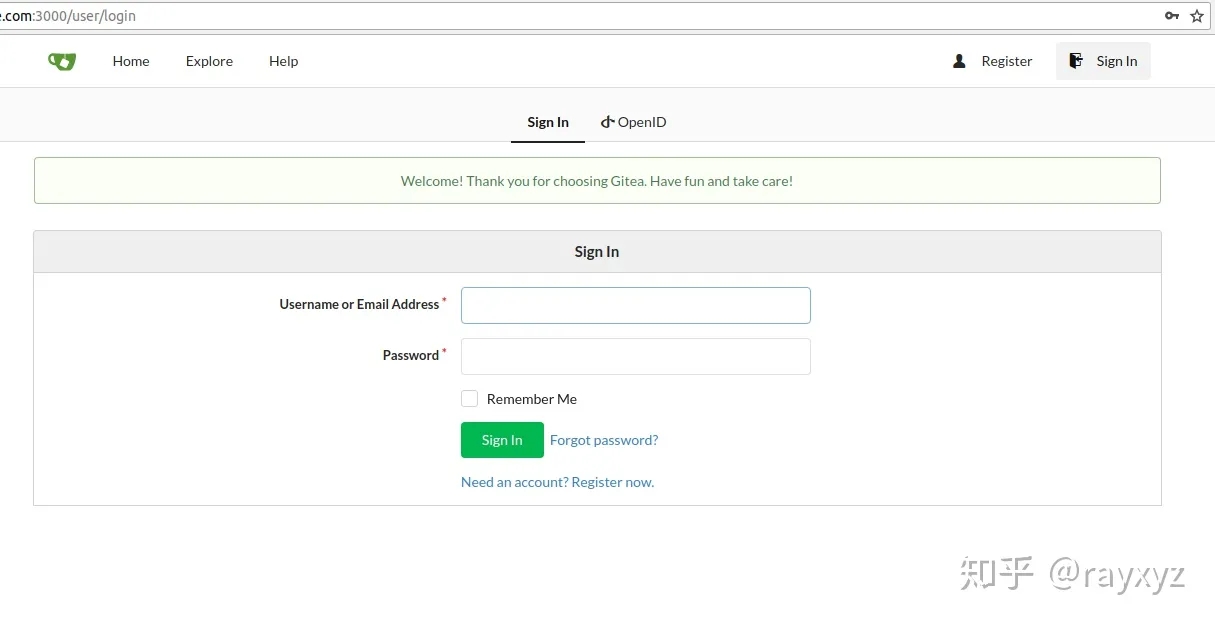
安装过程很快;成功后的页面:
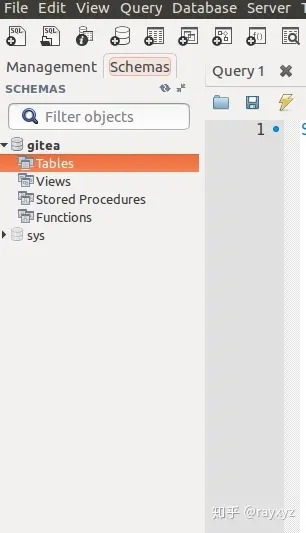
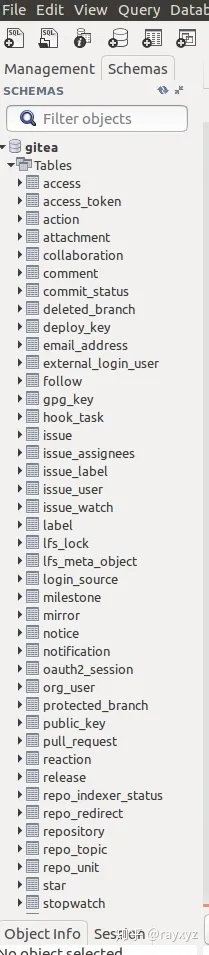
安装完成后数据库多了很多gitea相关表:
服务器上/etc/gitea/app.ini文件中生成的配置信息:
APP_NAME = Gitea: Git with a cup of tea
RUN_USER = git
RUN_MODE = prod

[security]
INTERNAL_TOKEN = eyJhbGciOiJIUzI1NiIfsdfI6IkpXVCJ9.eyJuYmYiOjE1NDYfyMjV9.WetQkOquArFo3Efsdfq5UbAXfltWG1IJPtUOs9DqY
INSTALL_LOCK   = true
SECRET_KEY     = biMTGodVmUon4A2PMRrewrweRkMWJzmzrvbNqufWerwer5bDZzkUFegA2G0T9gWR

[database]
DB_TYPE  = mysql
HOST     = www.xyz.com:3306
NAME     = gitea
USER     = root
PASSWD   = 123456
SSL_MODE = disable
PATH     = data/gitea.db

[repository]
ROOT = /home/git/gitea-repositories

[server]
SSH_DOMAIN       = www.xyx.com
DOMAIN           = www.xyz.com
HTTP_PORT        = 3000
ROOT_URL         = http://www.xyz.com:3000/
DISABLE_SSH      = false
SSH_PORT         = 22
LFS_START_SERVER = true
LFS_CONTENT_PATH = /var/lib/gitea/data/lfs
LFS_JWT_SECRET   = uwMPQQYMgpfedf1AVv1dfS11mKY0iC4pnb42HgrUfGsY
OFFLINE_MODE     = false

[mailer]
ENABLED = false

[service]
REGISTER_EMAIL_CONFIRM            = false
ENABLE_NOTIFY_MAIL                = false
DISABLE_REGISTRATION              = false
ALLOW_ONLY_EXTERNAL_REGISTRATION  = false
ENABLE_CAPTCHA                    = false
REQUIRE_SIGNIN_VIEW               = false
DEFAULT_KEEP_EMAIL_PRIVATE        = false
DEFAULT_ALLOW_CREATE_ORGANIZATION = true
DEFAULT_ENABLE_TIMETRACKING       = true
NO_REPLY_ADDRESS                  = noreply.example.org

[picture]
DISABLE_GRAVATAR        = false
ENABLE_FEDERATED_AVATAR = true

[openid]
ENABLE_OPENID_SIGNIN = true
ENABLE_OPENID_SIGNUP = true

[session]
PROVIDER = file

[log]
MODE      = file
LEVEL     = Info
ROOT_PATH = /var/lib/gitea/log
各个属性的描述请参考:https://docs.gitea.io/en-us/config-cheat-sheet/如果我们在设置的时候没考虑周全,想要修改配置,却发现不能进到初始化安装页面了;此时,修改/etc/gitea/app.ini中的INSTALL_LOCK = false,重启gtiea服务'sesrvice gitea restart',刷新页面就再一次进入到初始化安装页面了。
到此,Gitea已经安装完成了,接下来就类似Github一样,注册用户,开始Gitea之旅。
转自:https://zhuanlan.zhihu.com/p/54211615?from_voters_page=true&utm_id=0