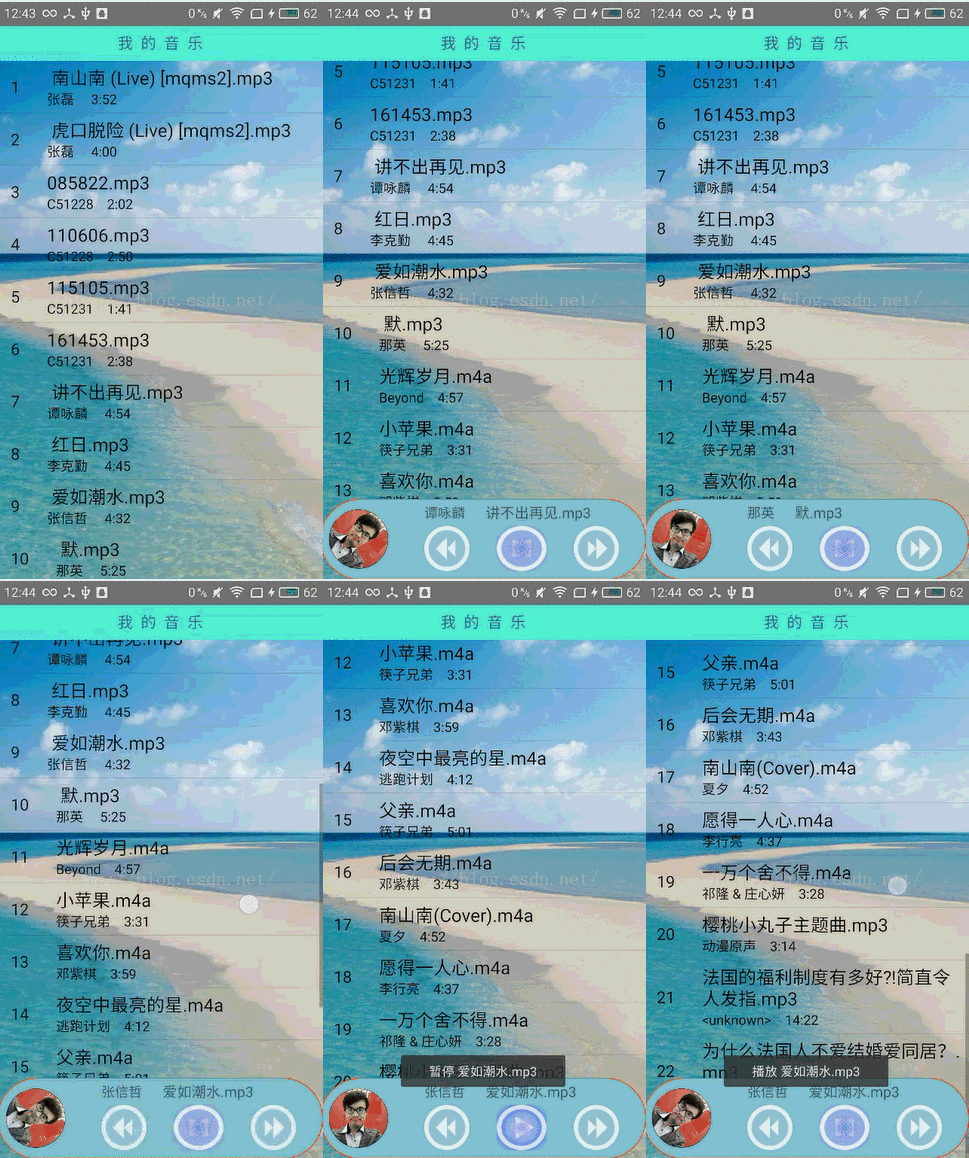
运行效果

这篇博客还是接着上一篇Android音乐播放器制作写的,没看过的可以去看看
其中这个效果(圆形ImageView和控件匀速旋转):

我前面的博客中写到过我就不一一细说了:
图片变成圆形:android图片处理,让图片变成圆形
旋转:android图片处理:让图片一直匀速旋转
文字跑马灯:TextView的跑马灯效果以及TextView的一些属性
具体实现
首先是布局文件中添加了如下代码,这些代码就是实现控制台的,给整体设置了一个invisible,为了让他点击有音乐播放的时候控制台才显示出来:
<RelativeLayout
android:id=”@+id/main_control_rl”
android:layout_width=”match_parent”
android:layout_height=”90dp”
android:layout_alignParentBottom=”true”
android:background=”@drawable/bottom_control_shape”
android:visibility=”invisible”>
<com.duanlian.mymusicplayerdemo.view.CircleImageView
android:id=”@+id/control_imageview”
android:layout_width=”65dp”
android:layout_height=”65dp”
android:layout_centerVertical=”true”
android:layout_marginLeft=”10dp”
android:src=”@mipmap/duanlian” />
<TextView
android:id=”@+id/control_singer”
android:layout_width=”wrap_content”
android:layout_height=”wrap_content”
android:layout_marginLeft=”40dp”
android:layout_marginTop=”5dp”
android:layout_toRightOf=”@+id/control_imageview”
android:text=”歌手名”
android:textSize=”15sp” />
/>
<TextView
android:id=”@+id/control_song”
android:layout_width=”150dp”
android:layout_height=”wrap_content”
android:layout_marginLeft=”15dp”
android:layout_marginTop=”5dp”
android:singleLine=”true”
android:ellipsize=”marquee”
android:marqueeRepeatLimit=”marquee_forever”
android:layout_toRightOf=”@+id/control_singer”
android:text=”歌曲的名字是不是很长”
android:textSize=”16sp” />
<RelativeLayout
android:layout_width=”match_parent”
android:layout_height=”50dp”
android:layout_alignParentBottom=”true”
android:layout_marginBottom=”10dp”
android:layout_marginLeft=”10dp”
android:layout_toRightOf=”@+id/control_imageview”>
<Button
android:id=”@+id/playing_btn_previous”
android:layout_width=”50dp”
android:layout_height=”50dp”
android:layout_marginLeft=”30dp”
android:background=”@drawable/last_select”
android:onClick=”control” />
<Button
android:id=”@+id/playing_btn_pause”
android:layout_width=”55dp”
android:layout_height=”55dp”
android:layout_centerHorizontal=”true”
android:background=”@drawable/play_press”
android:onClick=”control” />
<Button
android:id=”@+id/playing_btn_next”
android:layout_width=”50dp”
android:layout_height=”50dp”
android:layout_alignParentRight=”true”
android:layout_marginRight=”30dp”
android:background=”@drawable/next_select”
android:onClick=”control” />
</RelativeLayout>
</RelativeLayout>
其中的
<com.duanlian.mymusicplayerdemo.view.CircleImageView
android:id=”@+id/control_imageview”
android:layout_width=”65dp”
android:layout_height=”65dp”
android:layout_centerVertical=”true”
android:layout_marginLeft=”10dp”
android:src=”@mipmap/duanlian” />
这个是自定义圆形图片,之前的博客已经说过了,具体可以去看
,然后控制的这种效果是背景添加了一个shap

代码如下:
<?xml version=”1.0″ encoding=”utf-8″?>
<shape
xmlns:android=”http://schemas.android.com/apk/res/android”>
<corners android:radius=”200.0dip” />
<solid android:color=”#84C3D1″ />
<stroke android:width=”1.0dip” android:color=”#ffff6000″ />
</shape>
点击上一曲下一期的变化效果:

添加了一个点击的selector:
<selector xmlns:android=”http://schemas.android.com/apk/res/android”>
<item android:state_window_focused=”false” android:drawable=”@drawable/last_normal” />
<item android:state_focused=”true” android:drawable=”@drawable/last_normal” />
<item android:state_pressed=”true” android:drawable=”@drawable/last_press” />
</selector>
布局文件搞定,下面是代码中的实现
首先就是声明的控件和一些变量增加了 这几个:
private int playPosition;//当前播放歌曲的序号
private boolean IsPlay = false;//是否有歌曲在播放
private Button playPause;//暂停和播放按钮
private TextView song;//歌曲名
private TextView singer;//歌手名
private ImageView imageView;//控制台的图片
private Animation animation;//动画
点击ListView的一下改变:
mListView.setOnItemClickListener(new AdapterView.OnItemClickListener() {
@Override
public void onItemClick(AdapterView<?> adapterView, View view, int i, long l) {
//创建一个播放音频的方法,把点击到的地址传过去
//list.get(i).path这个就是歌曲的地址
play(list.get(i).path);
播放暂停按钮图片变成播放状态
playPause.setBackgroundResource(R.drawable.pause_press);
//把当前点击的item的position拿到,知道当前播放歌曲的序号
playPosition = i;
//播放音乐的时候把是否在播放赋值为true
IsPlay = true;
//点击item让控制台显示出来
findViewById(R.id.main_control_rl).setVisibility(View.VISIBLE);
}
});
然后就是几个button的点击事件了:
/**
* 底部控制栏的点击事件
*
* @param view
*/
public void control(View view) {
switch (view.getId()) {
case R.id.playing_btn_previous://上一曲
//如果播放歌曲的序号小于或者等于0的话点击上一曲就提示已经是第一首了
if (playPosition <= 0) {
Toast.makeText(MainActivity.this, “已经是第一首歌了”, Toast.LENGTH_SHORT).show();
} else {
//让歌曲的序号减一
playPosition–;
//播放
play(list.get(playPosition).path);
playPause.setBackgroundResource(R.drawable.pause_press);
}
break;
case R.id.playing_btn_pause://暂停和播放
if (IsPlay == false) {
//播放暂停按钮图片变成播放状态
playPause.setBackgroundResource(R.drawable.pause_press);
//继续播放
mediaPlayer.start();
imageView.startAnimation(animation);
IsPlay = true;//是否在播放赋值为true
animation.start();
Toast.makeText(MainActivity.this, “播放” + list.get(playPosition).song, Toast.LENGTH_SHORT).show();
} else {
//播放暂停按钮图片变成暂停状态
playPause.setBackgroundResource(R.drawable.play_press);
//暂停歌曲
mediaPlayer.pause();
imageView.clearAnimation();//停止动画
IsPlay = false;//是否在播放赋值为false
Toast.makeText(MainActivity.this, “暂停” + list.get(playPosition).song, Toast.LENGTH_SHORT).show();
}
break;
case R.id.playing_btn_next://下一曲
//歌曲序号大于或者等于歌曲列表的大小-1时,让歌曲序号为第一首
if (playPosition >= list.size() – 1) {
playPosition = 0;
} else {
//点击下一曲让歌曲的序号加一
playPosition++;
}
//播放
play(list.get(playPosition).path);
//播放暂停按钮图片变成播放状态
playPause.setBackgroundResource(R.drawable.pause_press);
break;
}
}
最后还有设置歌曲名和歌手名的:
/**
* 控制歌曲和歌手TextView的方法
*/
private void setText() {
song.setText(list.get(playPosition).song);
song.setSelected(true);//当歌曲名字太长是让其滚动
singer.setText(list.get(playPosition).singer);
}
就是这个简单
demo地址:http://download.csdn.net/detail/dl10210950/9628391
————————————————
版权声明:本文为CSDN博主「段炼Android」的原创文章,遵循CC 4.0 BY-SA版权协议,转载请附上原文出处链接及本声明。
原文链接:https://blog.csdn.net/dl10210950/article/details/52512513